The presence of e-mail in any user of a personal computer in the modern world is the norm and a necessity. Someone has one email address, someone, due to needs or preferences, has several mailboxes. Correspondence with friends, clients, mailings, notifications about upcoming events - all this has become an integral part of life. If you have one address, checking for new letters and sending responses is quite simple. The situation becomes much more complicated if there are several email addresses.
Mail applications have been developed to work with a certain number of accounts at the same time. The most popular is Outlook, which Microsoft ships by default with Microsoft Office along with other programs.
Benefits of choosing Outlook as your email client
Using the Microsoft app allows you to:
- Collect information from various mailboxes and servers in one application.
- Save download timeand view the update of the inbox list.
- Set up synchronization period for mailboxes.
- Apply sorting, grouping and assign filters to incoming correspondence according to priorities.
- Back up and archive mailbox contents.
- Quickly reply to incoming emails in one app.
- Retrieve information quickly when using mailboxes containing a large number of letters.
The abundance of functions and settings of Outlook allows us to consider the application a leader among similar programs from other developers.
In the twenty-year history of the existence of the mail manager, 8 versions were released that Microsoft created as they developed and released new releases of Windows and Mac OS operating systems.
Where to start
Users who first encounter using the application often have questions about what and where to configure Outlook so that there are no problems and failures when working with mail. Setting up mail begins with adding accounts when you first launch the application.
Welcome window and mailbox creation
The Initial Setup Wizard will open a dialog where you just need to click the "Next" button.
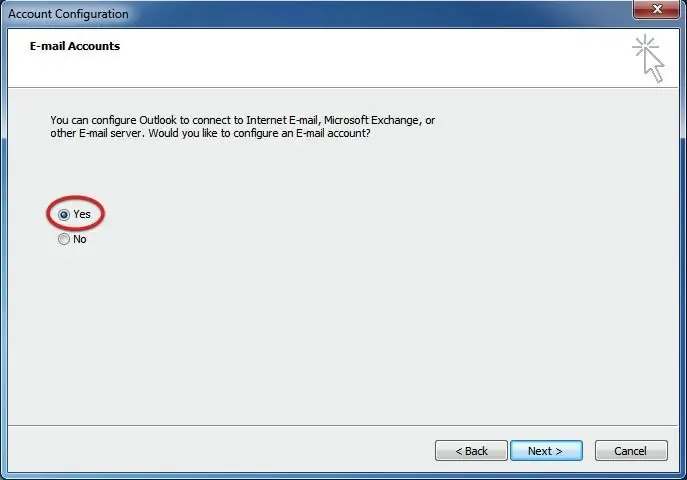
In a new window, if there are valid email accounts, you need to make sure that the "Yes" item is highlighted and use "Next" again to go to the next step.
Auto setup
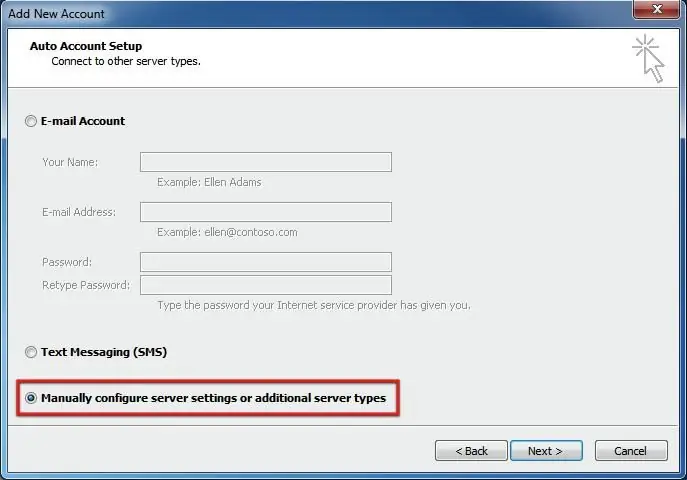
When the "Add a new account" window appears, you are offered a choice between automatic and manual account settings. Automatic Outlook setup works in cases where the application can get the settings for connecting to the mail server on its own. To do this, just enter the login and password for your email account.
Manual setting
But more often you need to perform additional settings for Outlook mail for correct synchronization and connection to the mailbox. Access is granted when opening the "Manually configure server settings or additional types of servers" section.
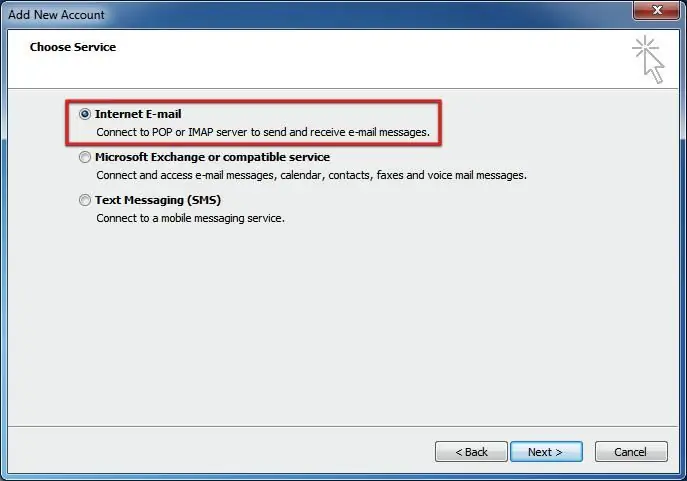
In the new dialog that opens, the first option "Internet E-mail" is selected from the possible types of connection.
What information is required to set up Outlook mail
When moving to the next window, the user is prompted to fill in 7 fields:
- "Enter name" is for information about the owner, such as first and last name, or a convenient abbreviation. This data is displayed as the sender in the message.
- "Email address" - the name of the email account to be added.
- "Account type" - it is proposed to select one of the options from the standard list. For correct access to correspondence, POP3 is required.
- "Incoming mail server" -the address for received letters is registered. The address is formed as follows: pop. and postal address. For example: pop.yandex.ru, pop.gmail.ru. If you have corporate mail, you can check the server address and additional settings with your system administrator or in the hosting help sections.
- The address for the "Outgoing mail server" field is formed in the same way, but instead of pop. registered smtp. For example: smtp.yandex.ru, smtp.gmail.ru.
- The corresponding fields indicate the username and password for connecting to the mailbox.
- In some situations (for example, e-mail created using the services of a hosting company), the server addresses for incoming and outgoing mail differ from the standard ones, and messages can only be exchanged through a connection on a specific port. To specify the appropriate settings, you need to go to the "Other settings" button in the section for specifying and enabling additional options. In the new window that appears, go to the "Outgoing Mail Server" tab. If the host or mail service provider requires SMTP authorization, you must check the box next to "SMTP requires authentication". In the fields "Username and password" enter the relevant data. A checkmark next to "Remember password" will allow you to avoid entering a password each time to synchronize data. To specify additional connection parameters, go to the "Advanced" tab. In this section, you should specify the port numbers forconnection to the incoming and outgoing mail server. It must be remembered that the numbers are different, and care must be taken when entering data. "Encrypted connection required (SSL)" must be checked and the encryption type must be SSL.
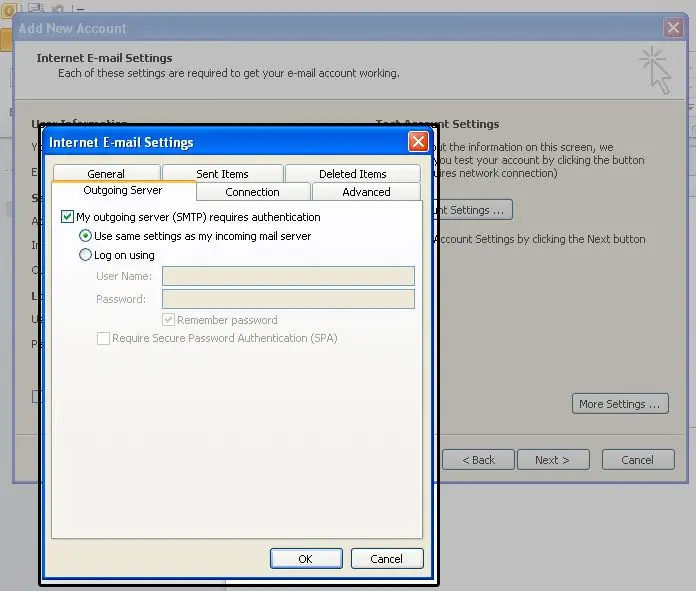
The settings are saved by pressing the OK button
After completing the data entry for the email, you can check the correctness of the work by clicking on the "Check account" button. If errors occur, the application will report what happened and indicate the reason. It is enough to fix the problem and repeat the settings check.
If all the settings are correct, the connection to the mail account will be performed and a test message will be sent.
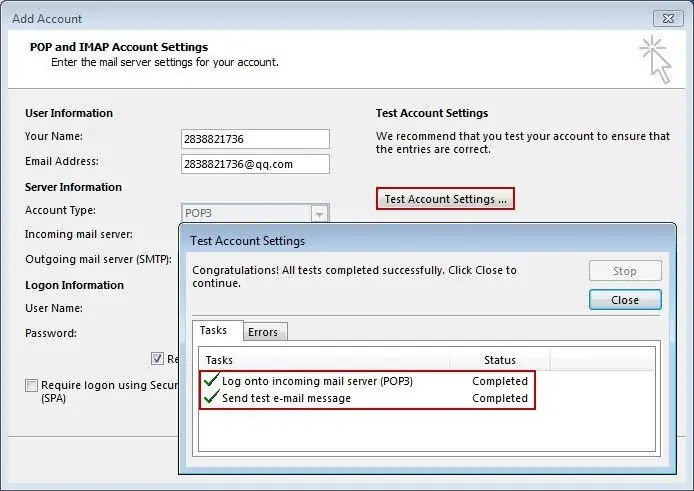
Complete the application wizard and close the window by clicking the "Finish" button.
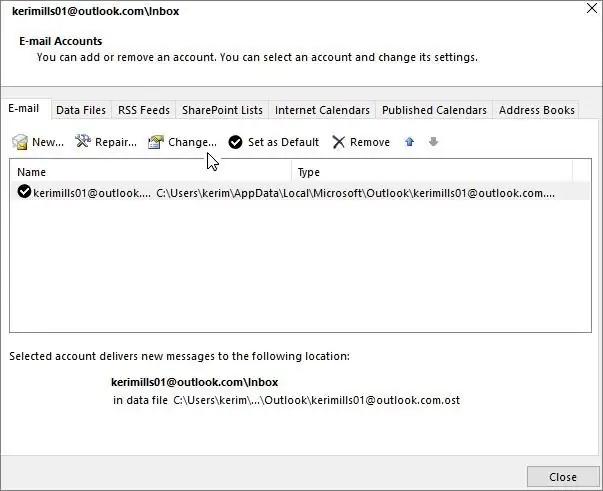
If you need to make changes to the settings, add or delete a mailbox, you should find the "Account Settings" section in the "File" menu.
Working with folders. Outlook Rules
Working with Outlook also implies the ability to create folders and rules that allow you to automatically sort incoming correspondence in accordance with the specified requirements and needs. Using this feature will save time on reviewing received emails and learning about receipts.incoming important message almost instantly.
To create a new folder, it is enough to perform the following sequence of manipulations:
- In the left navigation menu, you need to find and highlight the "Inbox" folder with the cursor.
- In the "File" menu, click on "Folders", then select "Create Folder".
- In the "Folder name" field, enter the desired name. Make sure that the "Mail type items" view is selected in the bottom "Folder Contents" area, and that the main folder is selected as the "Place Folder In" parent folder.
- Complete the creation of a new folder by pressing the OK button.
Next, you can create rules based on which messages will be sorted into folders. Outlook settings and rules are prescribed taking into account the destination folder where the incoming message should go, and a set of parameters, which can be the type of letter, sender, keywords that are in the subject or text of the correspondence. In addition, you can assign a specific color to messages from a specific sender or private messages. Access to creating, editing and deleting rules is performed through the item "Service", "Rules and alerts".
How to perform a factory reset
If you need to reset Outlook settings to its original state, just delete the account and the data file for connected accounts through the "Control Panel" in the "Mail" section. The procedure takes a few minutes and allows you to configureOutlook adding new mailboxes.
After a deeper study of the capabilities of Outlook, it is recommended to use the application not only as an email client, but also as a notebook, organizer and event planner. It should be noted that in the latest released version of the Microsoft Office package, many reasons for user complaints have been eliminated and the program has received new features for more efficient work.


